I ADORE functional things...
So when you weave the best of both worlds you have a very happy Lumber Jack's wife.
My job as the president of a corporation is to make things run smoothly. While I often pop in at the job site to do safety checks or bring a little sunshine now and then, most of the work I do is behind the scenes. I am my own office manager. One of the most noteworthy things I did in life when I worked outside of the home was entering into a place of business and building the organizational structure from near scratch. I love working through details, finding things that are smart and making things run smoother.
I struggle with this in my own office. I tend to get emotionally attached and am comforted by things I have, even though they just don't work well. Add to this problem the fact that my office area is used for many, many things because it's large and there is tons of room to spread out. During the day, I enjoy having my kids do their school work and it makes it convenient when I am multitasking. Needless to say, it's best if my business stuff is not spread out all over the place.
At the beginning of the year I had a great vision for revamping and reorganizing my work areas. What month is it now? Yeah, 4 months later and I still have this great dream with little to no motivation...
Which bring us to today's project.
I love pinterest. Not so much because I accidentally come across an idea, but rather because once I have an idea I can go and look at the end product and see if I really like it or not. Hey, my time is valuable and who honestly wants to end up with an ugly project?
One day last week I decided that because I am a person who no matter what, will choose to pile their papers verses organizing in a more practical way, I must do something to save hours hunting for ALL the paperwork of like kind. Have you ever picked through a pile, placed it down, picked some more, found the item you are looking for and then just tidied the pile back up again? This means CHAOS when you are in a hurry and need ALL papers of like kind.
In steps my old love... and old way of office organization. I am going to use some of the tools I have implemented in the past that worked. Best thing... VERY little upkeep.
Off I go to the supply area and grab a few 3 ring binders. I sat and looked at them. They are black and utilitarian. Practical and useful but drab. Maybe scrapbooking them will make them look better... Off to pinterest I go. NOPE... That was NOT what I was looking for. After all I am the president of this Corporation, how will this look professional in my office? A few days later I by chance came across a blog that was showcasing something entirely different. In the background there sat my ideal binders.
Dang! $40 each... I am too cheap for that... Back to pinterest I went. YES! This will work!
So here is my journey to create something practical, organizational and frugal.
First, I found some fabric that I liked. It had good texture and the perfect color. On my way to the fabric store I stopped off to see if I could find any scrap fabric at the thrift store. Instead I found this great table cloth for $1

You must iron. Any little wrinkle will be seen. I had been warned of this ahead of time. There is no way to get the fabric pulled tight enough to get the wrinkles out.

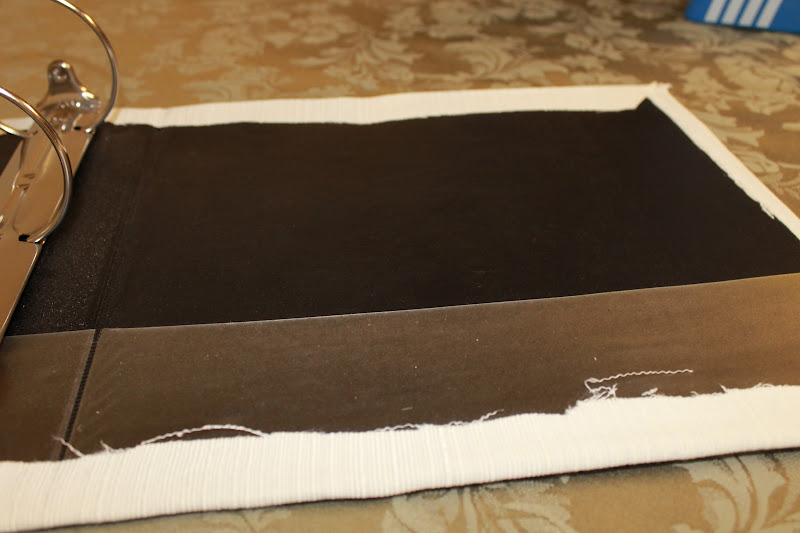
After you choose your binders (mine are 3") cut your fabric leaving 1/2 inch on all sides.

Now, I have seen where other people used hot glue, fabric glue and elmers glue. Personally, since I was going to go through all of this work, I wanted it to be done right the first time. I found this bonding spray at the craft store and it works great for cloth to plastic applications. $12

You will want to protect your area. Anything that gets sprayed becomes super sticky. Garbage bags did the trick. Spray a light coat. Quickly press your binder and begin smoothing. Start with one end and be sure to close the binder before working the opposite end. It won't close all the way if you don't.

Fold over the seams. If you sprayed all of your fabric it will stick nicely.
By now it should look something like this.

Cut a small square for the inside flaps. I left about 1/4 to 1/2 inch so I could fold over the edges. Spray the plastic this time. Start at the middle where the hardware is and work to the ends. This way you can tuck the fabric under the metal leaving a finished look.

This is what it should look like once you have completed these steps.

I found some great hardware at the craft store as well. These book plates come in 3 sizes per pack. I heard that you can find self adhesive ones as well. $5

My first binder. Quite simple and to my liking.Could probably go in any room, not just the office.

Binder #2. Found ribbon yesterday (yes, at a thrift store) that was a perfect match to the blue accent I am using in the office.

Binder #3. The bohemian feathers and seashell thing is my personality sneaking through. I adore anything brown, this includes burlap and twine.

The 3 of them together on the credenza. You can see there to the left, the magazine holders that are just about to get the same make over so they all coordinate!

My completed trio!

I have enough fabric, spray and accessories left to make over 3 more holders. I will place tags inside of the binders which will be free since I already have the card stock. Remaking these total cost was almost $18.00 total. Divide that by 6 (I may get more but being conservative here) the total cost each is $3.00 per binder. Compare that to the $40 Target wanted... and I come out a winner!
I LOVE them, way to go Jenn!!!!!!1
ReplyDeleteBeautiful!
ReplyDelete